Friday, December 31, 2010

Candied Brandied Apple Tartlets

I have a minor obsession with making bite-sized desserts. I think it stems from the fact that I always want to try one of everything, and with bite-sized desserts, I can actually do that, and keep my sugar intake to a (somewhat) reasonable level. I was looking for a fun spin on apple pie, and for some reason, I decided that brandy would go great in an apple pie. Not really sure why that struck me, other than the fact that brandy rhymes with candy, and candied apples are good, but sure enough, Martha Stewart had a recipe. But like I said, I wanted bite-sized. So, I made it into tartlets. And then, when I was done, I decided they didn't look pretty enough. They needed something more. And the name Candied Brandied Apple Tartlets sounded really fun. So I added a candy apple drizzle. Yum! These were a big hit with my friends!


Candied Brandied Apple Tartlets (adapted from Martha Stewart and Allrecipes.com)

Crust

  • 1 c. all-purpose flour
  • 1/4 c. whole-wheat flour
  • 2 Tbl. granulated sugar
  • 1/4 tsp. salt
  • 1/4 tsp. baking powder
  • Pinch of mace
  • 14 Tbl. cold butter, cut into small pieces
  • 2 Tbl. brandy, chilled
  • 1/2 Tbl. vanilla extract
  • 1 egg white

In a food processor, pulse together flours, sugar, salt, baking powder, and mace. Add butter and pulse until only pea-sized clumps form. Mix together the brandy, vanilla, and egg white, and add it to the food processor. Pulse until the mixture begins to come together. Turn out the dough onto a sheet of cling wrap. Flatten into a disk, and wrap tightly with cling wrap. Refrigerate for at least 1 hour.

Filling

  • 1/4 c. white sugar
  • 3 Tbl. packed brown sugar
  • 3 Tbl. all-purpose flour
  • 1 1/2 Tbl. cornstarch
  • 1 tsp. cinnamon
  • 1/2 tsp. nutmeg
  • 1/4 tsp. cloves
  • 1/4 tsp. allspice
  • Pinch of mace
  • 8 medium-sized red apples (such as Rome), peeled and shredded
  • 1/4 c. brandy
  • 1 Tbl. vanilla extract

Sift together sugars, flour, cornstarch, and spices. In a gallon-sized ziplock bag, combine apples, brandy, and vanilla extract. Toss until well-mixed. Add the flour mixture to the apples, and again, massage until combined.

Roll out the crust dough until it is about 1/8 in. thick, and cut it into small rounds (approximately 2 1/2 inches in diameter) that will fit into a mini muffin cup. Put one round into each well of a greased mini muffin tin. Cut the corner off the ziplock bag, and pipe some apple filling into each crust (you want to fill it pretty full).

Bake uncovered for about 20-25 minutes at 375 degrees F, or until apples are cooked and crusts are golden brown. Let cool.

Topping

  • 3/4 c. cinnamon red hot candies
  • 2 Tbl. brandy

Combine brandy and red hots in a small saucepan. Heat over medium-high heat, swirling occasionally, until a candy thermometer reads 300 degrees F. Note: be careful! It takes forever for the candies to get to about 280 degrees, but once you get even the slightest bit over 300 degrees, the temperature shoots up really quickly, and the candies will taste burnt before you realize it! Not that I know from experience....

Cool the molten candy slightly, then use a spoon to drizzle it over the cooled tartlets.

Wednesday, December 29, 2010

What's Baking? December Round-Up!


I had the honor of hosting December's "What's Baking?" challenge--yay! For my theme, I chose holiday colors--red, green, blue, whatever color was associated with your December holiday of choice. There were lots of great entries, and I look forward to making all of these!

Jen at Beantown Baker made an amazing Red Velvet Cheesecake Cake!


Heather at Hezzi-D's Books and Cooks made some scrumptious-looking Christmas Bark.


Lindsey at Our Share of the Harvest made these gorgeous raspberry and mint Triple Layered Brownies.


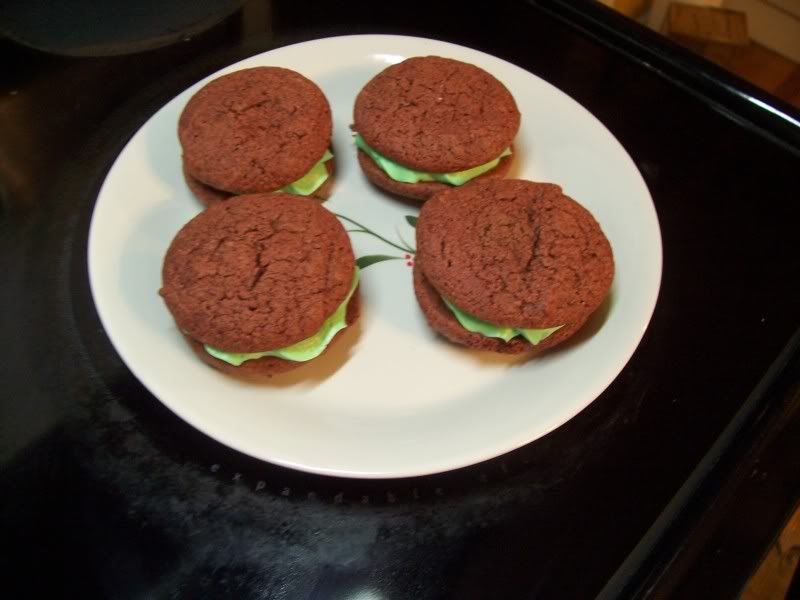
Catherine at Pursuing Domestic Goddess-ness made these pretty Red Velvet Sandwich Cookies.


Cara at The Boys Made Me Do It! made these festive M&M Christmas Cookies.


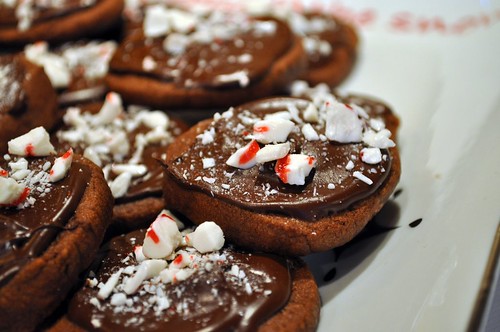
Jade at The Mess Pot made these delicious-looking Peppermint Chocolate Cookies.


Amanda at Our Italian Kitchen made these fun Colorful Swirl Cookies.


Ange at The Tiny Tyrant's Kitchen made these super-cute Reindeer Cookies.


Jey at The Jey of Cooking made these colorful Pinwheel and Candy Cane Cookies.


And finally, your humble hostess, Steph, of Brownies and Blondies made Peppermint Fudge.

What's Baking: Peppermint Fudge

So, I got to be the host of "What's Baking?" this month--yay! For my theme, I chose holiday colors. Now, I only used one holiday color, and that's red, but I think the results are delicious enough that you won't mind the absence of green!


I have a friend who can't have gluten. As such, I couldn't give her the yummy cookie dough mix I gave everyone else, so I needed an alternative. Fudge seemed like the perfect thing! And peppermint fudge would be fun-looking and seasonal! Just be sure to find candy canes that are gluten-free (some are rolled in flour before packaging). Besides being delicious, this fudge is also really simple--no candy thermometer required!


Peppermint Fudge (slightly adapted from Allrecipes.com)

  • 2 (10-oz) bags of white chocolate chips
  • 1 14-oz. can sweetened condensed milk
  • Healthy splash (otherwise known as 1-2 Tbl.) Peppermint Schnapps
  • 1 1/2 c. crushed candy canes, divided
  • A couple drops of red food coloring

Line an 8x8 pan with foil, and grease it with baking spray.

Pour the white chocolate chips and sweetened condensed milk into a medium saucepan. Heat over medium-low heat, stirring constantly, until chips are nearly melted. Remove from heat and continue stirring until all chips are melted and the mixture is smooth. Mix in Peppermint Schnapps and 1 c. of cushed candy canes, stirring until well-combined. Add a couple drops of red food coloring to different areas of the pan, and stir once or twice, just to slightly swirl in the food coloring. Transfer mixture to the 8x8 pan, and top with remaining crushed candy canes. Refrigerate several hours, or until firm.

Tuesday, December 7, 2010

Destination Post: Pumpkin Cheesecake-Swirled Brownies

Whoa, a post! Crazy, right? Ok, so life got a little hectic around Thanksgiving. And then I noticed holiday lbs creeping up. So, I've been trying not to bake so much at home, since baking inevitably means eating. So, I haven't had much to post. However, that hasn't stopped me from baking at school, for sure!

Just before Thanksgiving, the executive chef finally gave in to my begging and pleading and bought me a case of pumpkin puree. Now, this would have been much more convenient had he given in, you know, in October, so that I could have used it throughout the fall, but what can you do? One of the stipulations he gave me when he bought it was that he didn't want it sitting around forever, so I had to use it up by next year. Now, a case of pumpkin contains 6 #10-cans. For those of you who think 6 cans sounds like a pretty small number that should be easy to use up, let me explain something. You know those little cans of pumpkin that you buy in the store? They're 15 oz. Or 30 oz., if you get gutzy and go for the BIG can! Now, a #10 can contains 106 oz. of pumpkin puree. Yup. 106 oz. So, I've had pumpkin coming out my ears. And the kids have been getting a LOT of pumpkin-flavored treats. As I write this, I have finished off about 2 1/2 of the cans. So, the end isn't even in sight yet. Which all explains why, when the menu said that the kids were supposed to get brownies for dessert last Friday, they somehow mysteriously morphed into Pumpkin Cheesecake-Swirled Brownies. And they were all the better for it.


Pumpkin Cheesecake-Swirled Brownies (adapted from Allrecipes.com)

  • Your favorite brownie recipe (enough to make a 9x13" pan of brownies)
  • 12 oz. cream cheese, softened
  • 1/2 c. white sugar
  • 1 egg
  • 1 egg yolk
  • 1/2 tsp. vanilla extract
  • 1 Tbl. whipping cream
  • 1 1/2 tsp. cornstarch
  • 1/2 c. canned pumpkin
  • 1 tsp. cinnamon
  • 1/2 tsp. nutmeg
  • 1/4 tsp. ground cloves
  • 1/4 tsp. ground ginger
  • 1/4 tsp. salt

Prepare your favorite brownie recipe (or cheat and use a boxed mix, like I did) according to directions, making sure you make enough for a 9x13" pan (If you don't have a favorite brownie recipe yet, I recommend this one, minus the Oreos). Pour batter into a greased 9x13" pan and set aside (don't bake it yet!).

Beat cream cheese until light and fluffy. Add the sugar, and cream the mixture together until fluffy and uniformly incorporated. Next, add the egg and egg yolk, one at a time, beating each one into the batter before adding the next (This step is important, seriously. It's a pain, but makes for a much smoother batter than if you add them all at once. Trust me, I know this one from experience!). Add the vanilla extract and whipping cream, and mix until incorporated. Next, add the cornstarch, and beat until incorporated.

In a separate bowl, mix together pumpkin puree, cinnamon, nutmeg, cloves, ginger, and salt until thoroughly combined. Add this mixture to the rest of the cheesecake batter, and beat until fully incorporated.

Dollop the cheesecake batter over the raw brownie batter, and run a knife through it to swirl it together. Don't be tempted to swirl too much, or you'll lose the pretty marbled effect! Bake at 350 for ~30-40 minutes, or until a knife inserted about 1" from the edge comes out clean.

Wednesday, November 17, 2010

Oreo Brownies

It was time for another person's birthday treat. This particular young man requested brownies. As you've probably noticed, I HATE making standard, normal desserts. Like plain brownies. They obviously needed to be jazzed up somehow! Complicating this matter was the fact that I don't know this guy particularly well outside of the dance studio that we both dance at. So I wasn't sure of his tastes. I needed inspiration. I turned to one of my favorite blogs: Beantown Baker. And sure enough, I stumbled across a recipe for Oreo Brownies. Now, I already have an all-time favorite brownie base recipe, so I wasn't going to use the recipe she posted, but I gladly took inspiration from her post! And I'm glad I did! The birthday boy loved these! They were too sweet for my taste, but everyone else told me I was nuts when I expressed that opinion. So, by majority rule, these were awesome.


Oreo Brownies (adapted from David Lebovitz via Smells Like Home, with inspiration from Beantown Baker)

  • 1 c. butter
  • 8 oz. semisweet chocolate chips
  • 2 1/2 c. sugar (feel free to decrease this...as I said, they turned out REALLY sweet)
  • 4 eggs
  • 2 tsp. vanilla extract
  • 1 c. flour
  • 1/4 tsp. salt
  • 1 package of Oreos, roughly chopped

Combine butter and chocolate chips in a large, microwave-safe bowl. Microwave, stirring every 30 seconds, until chocolate and butter are thoroughly melted. Stir in sugar and vanilla extract, then beat in eggs, one at a time. Sift together flour and salt, then mix this into the chocolate mixture, stirring just until combined. Stir in the Oreos. Pour batter into a greased 9x13" pan.

Bake at 350 degrees for 50 minutes, or until a toothpick inserted about an inch from the edge comes out clean.

Sunday, November 14, 2010

Destination Post: Pumpkin Mousse Tartlets with Maple Drizzle

Welcome to a destination post! As I mentioned in my last post, I have a new job--baking! This post is brought to you from the kitchen at my job, rather than from my home kitchen. We celebrated Thanksgiving early for the kiddos and did a whole Thanksgiving meal, complete with turkey, mashed potatoes, gravy, roasted green beans, mashed sweet potatoes served in cute little orange halves, and...pumpkin pie! Sort of. Actually, pie shells filled with a pumpkin mousse and drizzled with maple icing. I'll do my best to re-create the recipe here, but we tinkered with it substantially over the course of making these, so it'll be a close approximation.


You see, I had to make 500 tartlets. That's a lot. In fact, I really had no concept as to exactly how many until I had seven industrial-sized sheet pans filled with pre-baked tart shells. And it was right about then when I realized that the amount of pumpkin mousse I had made (by multiplying this recipe by SIX) was not going to be enough. It wasn't even going to be close to enough. Thankfully, that same day, I had been making tiramisu filling. In contrast to the pumpkin mousse, the tiramisu recipe made a LOT of extra filling. So, I folded some into the pumpkin mousse, figuring I could always add more cinnamon/nutmeg/ginger to increase the pumpkin flavor. And then I tasted the pumpkin mousse. And it was PERFECT! Score! These were a big hit with both the kids and the staff (the executive chef, who claims he doesn't have much of a sweet tooth, ate THREE right in front of me!).


Pumpkin Mousse Tartlets with Maple Drizzle (adapted from Epicurious.com)

  • Dough for a 9" double pie crust
  • 1 (1/4-oz) envelope unflavored gelatin
  • 1/4 c. cold water
  • 1 (15-oz) can pumpkin puree
  • 1/2 c. packed brown sugar
  • 1/2 tsp. cinnamon
  • 1/2 tsp. nutmeg
  • 1/2 tsp. ginger
  • 1/8 tsp. salt
  • 2 c. heavy cream
  • 8 oz. mascarpone cheese
  • 2 1/4 c. powdered sugar, divided
  • 2 tsp. vanilla extract, divided
  • 1/4 c. maple syrup
  • 4 Tbl. milk, or as needed

Roll out the dough to a thin layer. Cut into approximately 3" squares using a pizza cutter or sharp knife. Fit each square into a well of a well-greased, normal-sized muffin tin. Grease the BOTTOM of another muffin pan, and put it on top of the first, to act as pie weights. Bake the crusts at 375 degrees F for about 8-10 minutes, or until deep golden brown. Cool.

Sprinkle the gelatin over the cold water in a small saucepan. Let bloom for about 1 minute. Bring to a boil, stirring constantly, until gelatin is completely dissolved. In a large bowl, cream the mascarpone (can substitute cream cheese) with the brown sugar. Mix in pumpkin, spices, salt, and gelatin mixture until well-combined.

In a separate bowl, whip the cream until it forms soft peaks. Add 1/4 c. powdered sugar and 1 tsp. vanilla, and continue whisking until it forms stiff peaks. Fold about 1/3 of the whipped cream into the pumpkin mixture, to lighten it. Then, fold in the remaining whipped cream. Refrigerate overnight to let the mixture set.

In a bowl, mix 2 c. powdered sugar, 1 tsp. vanilla extract, maple syrup, and enough milk until the mixture is smooth and at a drizzle-able consistency.


To assemble:
Pipe about 2-3 Tbl. of mousse into each pie crust shell. Drizzle the tarts with the maple icing.

Monday, November 8, 2010

Pumpkin Nanaimo Bars

So, you've probably noticed that my posting frequency has gone down. Substantially. Ironically enough, now that I actually have the funds to bake to my heart's content, I no longer have the time. Yup, that's right. I got a job. I'm now the resident baker at a private school in my town. The school previously did most of their baking from store-bought mixes, and they hired me to transition it more toward from-scratch baking! Sweet! The head chef also allows me a lot of freedom to try new recipes, so if there's something we need to make, he encourages me to bring in my own favorite recipe and to tweak it to fit my tastes! It's mostly breakfast baking--muffins, scones, eventually biscuits and quick breads--but there is some dessert baking, too. I made 500 pumpkin chocolate chip cookies for the kiddos last Friday!

So, while I am really excited to have this job and am really enjoying it, the fact that I work 75 hours a week between my two jobs is kind of cutting into my baking time. Phooey. I promise not to abandon you completely, though, faithful readers (all ten of you). And thus, I bring you this recipe. A fall twist on a traditional Canadian dessert. And boy, were they good! I mean, pumpkin and chocolate? Trust me, people...you WANT to make these. They're rich, though, so cut them small (we're talking 36-pieces-out-of-an-8x8-pan rich).


Pumpkin Nanaimo Bars (adapted from The Eclectic Cook)

  • 1 c. plus 2 Tbl. butter, softened, divided
  • 1/4 c. granulated sugar
  • 5 Tbl. cocoa powder
  • 1 egg
  • 1 1/4 c. graham cracker crumbs
  • 1/2 c. finely chopped almonds
  • 1 c. unsweetened coconut
  • 3 Tbl. heavy whipping cream
  • 2 Tbl. instant vanilla pudding mix
  • 2 c. powdered sugar
  • 1/4-1/2 c. pumpkin puree
  • 1-2 tsp. pumpkin pie spice
  • 4 oz. semi-sweet chocolate chips

Combine 1/2 c. butter, granulated sugar, and cocoa powder in small saucepan. Heat over medium-low heat until the sugar is melted and the mixture comes to a boil. Remove from heat and slowly drizzle into the beaten egg, whisking constantly until the mixture thickens. Stir in the graham cracker crumbs, almonds, and coconut. Press the mixture into the bottom of a well-greased 8x8- or 9x9-in baking pan. Let cool while you prepare the next layer.

Beat 1/2 c. butter until smooth. Beat in whipping cream, vanilla pudding mix, powdered sugar, pumpkin puree, and pumpkin pie spice until well-mixed and smooth. Feel free to adjust the amounts of pumpkin, powdered sugar, and pumpkin pie spice to your own taste. Spread this layer evenly over the cooled crust. Chill in the fridge until firm, while you prepare the third layer.

Melt chocolate chips and butter together (I prefer the microwave, but feel free to use a double boiler). Pour this over the top of the middle layer, and spread it so that it evenly covers the middle layer. Chill in the fridge until firm. Remove from fridge about a half hour before cutting so that the top chocolate layer can soften up a little (making it less likely to crack while cutting it). Devour.