Friday, December 31, 2010

Candied Brandied Apple Tartlets

I have a minor obsession with making bite-sized desserts. I think it stems from the fact that I always want to try one of everything, and with bite-sized desserts, I can actually do that, and keep my sugar intake to a (somewhat) reasonable level. I was looking for a fun spin on apple pie, and for some reason, I decided that brandy would go great in an apple pie. Not really sure why that struck me, other than the fact that brandy rhymes with candy, and candied apples are good, but sure enough, Martha Stewart had a recipe. But like I said, I wanted bite-sized. So, I made it into tartlets. And then, when I was done, I decided they didn't look pretty enough. They needed something more. And the name Candied Brandied Apple Tartlets sounded really fun. So I added a candy apple drizzle. Yum! These were a big hit with my friends!


Candied Brandied Apple Tartlets (adapted from Martha Stewart and Allrecipes.com)

Crust

  • 1 c. all-purpose flour
  • 1/4 c. whole-wheat flour
  • 2 Tbl. granulated sugar
  • 1/4 tsp. salt
  • 1/4 tsp. baking powder
  • Pinch of mace
  • 14 Tbl. cold butter, cut into small pieces
  • 2 Tbl. brandy, chilled
  • 1/2 Tbl. vanilla extract
  • 1 egg white

In a food processor, pulse together flours, sugar, salt, baking powder, and mace. Add butter and pulse until only pea-sized clumps form. Mix together the brandy, vanilla, and egg white, and add it to the food processor. Pulse until the mixture begins to come together. Turn out the dough onto a sheet of cling wrap. Flatten into a disk, and wrap tightly with cling wrap. Refrigerate for at least 1 hour.

Filling

  • 1/4 c. white sugar
  • 3 Tbl. packed brown sugar
  • 3 Tbl. all-purpose flour
  • 1 1/2 Tbl. cornstarch
  • 1 tsp. cinnamon
  • 1/2 tsp. nutmeg
  • 1/4 tsp. cloves
  • 1/4 tsp. allspice
  • Pinch of mace
  • 8 medium-sized red apples (such as Rome), peeled and shredded
  • 1/4 c. brandy
  • 1 Tbl. vanilla extract

Sift together sugars, flour, cornstarch, and spices. In a gallon-sized ziplock bag, combine apples, brandy, and vanilla extract. Toss until well-mixed. Add the flour mixture to the apples, and again, massage until combined.

Roll out the crust dough until it is about 1/8 in. thick, and cut it into small rounds (approximately 2 1/2 inches in diameter) that will fit into a mini muffin cup. Put one round into each well of a greased mini muffin tin. Cut the corner off the ziplock bag, and pipe some apple filling into each crust (you want to fill it pretty full).

Bake uncovered for about 20-25 minutes at 375 degrees F, or until apples are cooked and crusts are golden brown. Let cool.

Topping

  • 3/4 c. cinnamon red hot candies
  • 2 Tbl. brandy

Combine brandy and red hots in a small saucepan. Heat over medium-high heat, swirling occasionally, until a candy thermometer reads 300 degrees F. Note: be careful! It takes forever for the candies to get to about 280 degrees, but once you get even the slightest bit over 300 degrees, the temperature shoots up really quickly, and the candies will taste burnt before you realize it! Not that I know from experience....

Cool the molten candy slightly, then use a spoon to drizzle it over the cooled tartlets.

Wednesday, December 29, 2010

What's Baking? December Round-Up!


I had the honor of hosting December's "What's Baking?" challenge--yay! For my theme, I chose holiday colors--red, green, blue, whatever color was associated with your December holiday of choice. There were lots of great entries, and I look forward to making all of these!

Jen at Beantown Baker made an amazing Red Velvet Cheesecake Cake!


Heather at Hezzi-D's Books and Cooks made some scrumptious-looking Christmas Bark.


Lindsey at Our Share of the Harvest made these gorgeous raspberry and mint Triple Layered Brownies.


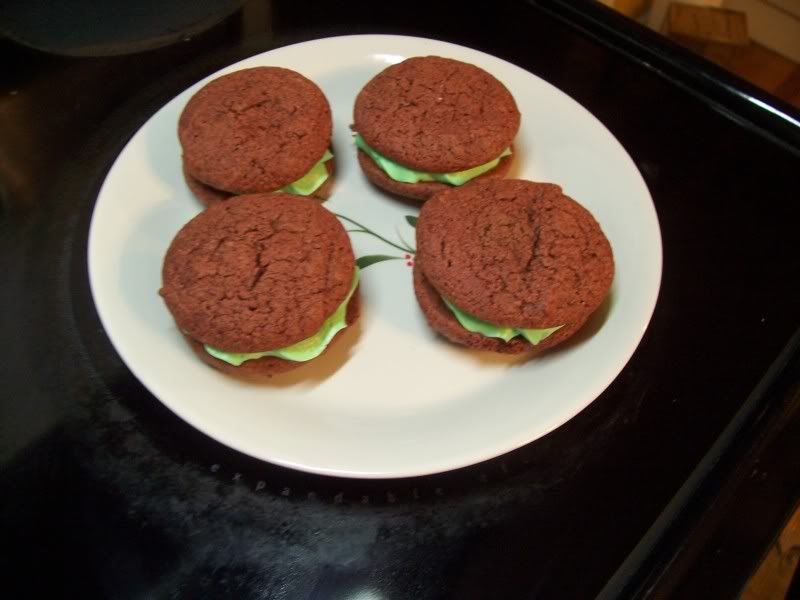
Catherine at Pursuing Domestic Goddess-ness made these pretty Red Velvet Sandwich Cookies.


Cara at The Boys Made Me Do It! made these festive M&M Christmas Cookies.


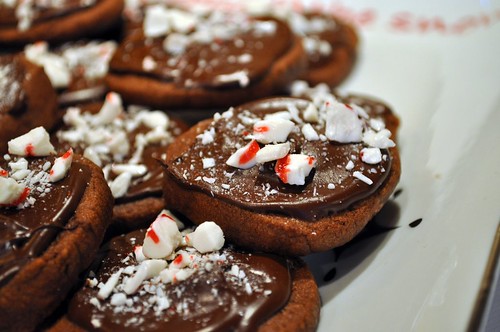
Jade at The Mess Pot made these delicious-looking Peppermint Chocolate Cookies.


Amanda at Our Italian Kitchen made these fun Colorful Swirl Cookies.


Ange at The Tiny Tyrant's Kitchen made these super-cute Reindeer Cookies.


Jey at The Jey of Cooking made these colorful Pinwheel and Candy Cane Cookies.


And finally, your humble hostess, Steph, of Brownies and Blondies made Peppermint Fudge.

What's Baking: Peppermint Fudge

So, I got to be the host of "What's Baking?" this month--yay! For my theme, I chose holiday colors. Now, I only used one holiday color, and that's red, but I think the results are delicious enough that you won't mind the absence of green!


I have a friend who can't have gluten. As such, I couldn't give her the yummy cookie dough mix I gave everyone else, so I needed an alternative. Fudge seemed like the perfect thing! And peppermint fudge would be fun-looking and seasonal! Just be sure to find candy canes that are gluten-free (some are rolled in flour before packaging). Besides being delicious, this fudge is also really simple--no candy thermometer required!


Peppermint Fudge (slightly adapted from Allrecipes.com)

  • 2 (10-oz) bags of white chocolate chips
  • 1 14-oz. can sweetened condensed milk
  • Healthy splash (otherwise known as 1-2 Tbl.) Peppermint Schnapps
  • 1 1/2 c. crushed candy canes, divided
  • A couple drops of red food coloring

Line an 8x8 pan with foil, and grease it with baking spray.

Pour the white chocolate chips and sweetened condensed milk into a medium saucepan. Heat over medium-low heat, stirring constantly, until chips are nearly melted. Remove from heat and continue stirring until all chips are melted and the mixture is smooth. Mix in Peppermint Schnapps and 1 c. of cushed candy canes, stirring until well-combined. Add a couple drops of red food coloring to different areas of the pan, and stir once or twice, just to slightly swirl in the food coloring. Transfer mixture to the 8x8 pan, and top with remaining crushed candy canes. Refrigerate several hours, or until firm.

Tuesday, December 7, 2010

Destination Post: Pumpkin Cheesecake-Swirled Brownies

Whoa, a post! Crazy, right? Ok, so life got a little hectic around Thanksgiving. And then I noticed holiday lbs creeping up. So, I've been trying not to bake so much at home, since baking inevitably means eating. So, I haven't had much to post. However, that hasn't stopped me from baking at school, for sure!

Just before Thanksgiving, the executive chef finally gave in to my begging and pleading and bought me a case of pumpkin puree. Now, this would have been much more convenient had he given in, you know, in October, so that I could have used it throughout the fall, but what can you do? One of the stipulations he gave me when he bought it was that he didn't want it sitting around forever, so I had to use it up by next year. Now, a case of pumpkin contains 6 #10-cans. For those of you who think 6 cans sounds like a pretty small number that should be easy to use up, let me explain something. You know those little cans of pumpkin that you buy in the store? They're 15 oz. Or 30 oz., if you get gutzy and go for the BIG can! Now, a #10 can contains 106 oz. of pumpkin puree. Yup. 106 oz. So, I've had pumpkin coming out my ears. And the kids have been getting a LOT of pumpkin-flavored treats. As I write this, I have finished off about 2 1/2 of the cans. So, the end isn't even in sight yet. Which all explains why, when the menu said that the kids were supposed to get brownies for dessert last Friday, they somehow mysteriously morphed into Pumpkin Cheesecake-Swirled Brownies. And they were all the better for it.


Pumpkin Cheesecake-Swirled Brownies (adapted from Allrecipes.com)

  • Your favorite brownie recipe (enough to make a 9x13" pan of brownies)
  • 12 oz. cream cheese, softened
  • 1/2 c. white sugar
  • 1 egg
  • 1 egg yolk
  • 1/2 tsp. vanilla extract
  • 1 Tbl. whipping cream
  • 1 1/2 tsp. cornstarch
  • 1/2 c. canned pumpkin
  • 1 tsp. cinnamon
  • 1/2 tsp. nutmeg
  • 1/4 tsp. ground cloves
  • 1/4 tsp. ground ginger
  • 1/4 tsp. salt

Prepare your favorite brownie recipe (or cheat and use a boxed mix, like I did) according to directions, making sure you make enough for a 9x13" pan (If you don't have a favorite brownie recipe yet, I recommend this one, minus the Oreos). Pour batter into a greased 9x13" pan and set aside (don't bake it yet!).

Beat cream cheese until light and fluffy. Add the sugar, and cream the mixture together until fluffy and uniformly incorporated. Next, add the egg and egg yolk, one at a time, beating each one into the batter before adding the next (This step is important, seriously. It's a pain, but makes for a much smoother batter than if you add them all at once. Trust me, I know this one from experience!). Add the vanilla extract and whipping cream, and mix until incorporated. Next, add the cornstarch, and beat until incorporated.

In a separate bowl, mix together pumpkin puree, cinnamon, nutmeg, cloves, ginger, and salt until thoroughly combined. Add this mixture to the rest of the cheesecake batter, and beat until fully incorporated.

Dollop the cheesecake batter over the raw brownie batter, and run a knife through it to swirl it together. Don't be tempted to swirl too much, or you'll lose the pretty marbled effect! Bake at 350 for ~30-40 minutes, or until a knife inserted about 1" from the edge comes out clean.

Wednesday, November 17, 2010

Oreo Brownies

It was time for another person's birthday treat. This particular young man requested brownies. As you've probably noticed, I HATE making standard, normal desserts. Like plain brownies. They obviously needed to be jazzed up somehow! Complicating this matter was the fact that I don't know this guy particularly well outside of the dance studio that we both dance at. So I wasn't sure of his tastes. I needed inspiration. I turned to one of my favorite blogs: Beantown Baker. And sure enough, I stumbled across a recipe for Oreo Brownies. Now, I already have an all-time favorite brownie base recipe, so I wasn't going to use the recipe she posted, but I gladly took inspiration from her post! And I'm glad I did! The birthday boy loved these! They were too sweet for my taste, but everyone else told me I was nuts when I expressed that opinion. So, by majority rule, these were awesome.


Oreo Brownies (adapted from David Lebovitz via Smells Like Home, with inspiration from Beantown Baker)

  • 1 c. butter
  • 8 oz. semisweet chocolate chips
  • 2 1/2 c. sugar (feel free to decrease this...as I said, they turned out REALLY sweet)
  • 4 eggs
  • 2 tsp. vanilla extract
  • 1 c. flour
  • 1/4 tsp. salt
  • 1 package of Oreos, roughly chopped

Combine butter and chocolate chips in a large, microwave-safe bowl. Microwave, stirring every 30 seconds, until chocolate and butter are thoroughly melted. Stir in sugar and vanilla extract, then beat in eggs, one at a time. Sift together flour and salt, then mix this into the chocolate mixture, stirring just until combined. Stir in the Oreos. Pour batter into a greased 9x13" pan.

Bake at 350 degrees for 50 minutes, or until a toothpick inserted about an inch from the edge comes out clean.

Sunday, November 14, 2010

Destination Post: Pumpkin Mousse Tartlets with Maple Drizzle

Welcome to a destination post! As I mentioned in my last post, I have a new job--baking! This post is brought to you from the kitchen at my job, rather than from my home kitchen. We celebrated Thanksgiving early for the kiddos and did a whole Thanksgiving meal, complete with turkey, mashed potatoes, gravy, roasted green beans, mashed sweet potatoes served in cute little orange halves, and...pumpkin pie! Sort of. Actually, pie shells filled with a pumpkin mousse and drizzled with maple icing. I'll do my best to re-create the recipe here, but we tinkered with it substantially over the course of making these, so it'll be a close approximation.


You see, I had to make 500 tartlets. That's a lot. In fact, I really had no concept as to exactly how many until I had seven industrial-sized sheet pans filled with pre-baked tart shells. And it was right about then when I realized that the amount of pumpkin mousse I had made (by multiplying this recipe by SIX) was not going to be enough. It wasn't even going to be close to enough. Thankfully, that same day, I had been making tiramisu filling. In contrast to the pumpkin mousse, the tiramisu recipe made a LOT of extra filling. So, I folded some into the pumpkin mousse, figuring I could always add more cinnamon/nutmeg/ginger to increase the pumpkin flavor. And then I tasted the pumpkin mousse. And it was PERFECT! Score! These were a big hit with both the kids and the staff (the executive chef, who claims he doesn't have much of a sweet tooth, ate THREE right in front of me!).


Pumpkin Mousse Tartlets with Maple Drizzle (adapted from Epicurious.com)

  • Dough for a 9" double pie crust
  • 1 (1/4-oz) envelope unflavored gelatin
  • 1/4 c. cold water
  • 1 (15-oz) can pumpkin puree
  • 1/2 c. packed brown sugar
  • 1/2 tsp. cinnamon
  • 1/2 tsp. nutmeg
  • 1/2 tsp. ginger
  • 1/8 tsp. salt
  • 2 c. heavy cream
  • 8 oz. mascarpone cheese
  • 2 1/4 c. powdered sugar, divided
  • 2 tsp. vanilla extract, divided
  • 1/4 c. maple syrup
  • 4 Tbl. milk, or as needed

Roll out the dough to a thin layer. Cut into approximately 3" squares using a pizza cutter or sharp knife. Fit each square into a well of a well-greased, normal-sized muffin tin. Grease the BOTTOM of another muffin pan, and put it on top of the first, to act as pie weights. Bake the crusts at 375 degrees F for about 8-10 minutes, or until deep golden brown. Cool.

Sprinkle the gelatin over the cold water in a small saucepan. Let bloom for about 1 minute. Bring to a boil, stirring constantly, until gelatin is completely dissolved. In a large bowl, cream the mascarpone (can substitute cream cheese) with the brown sugar. Mix in pumpkin, spices, salt, and gelatin mixture until well-combined.

In a separate bowl, whip the cream until it forms soft peaks. Add 1/4 c. powdered sugar and 1 tsp. vanilla, and continue whisking until it forms stiff peaks. Fold about 1/3 of the whipped cream into the pumpkin mixture, to lighten it. Then, fold in the remaining whipped cream. Refrigerate overnight to let the mixture set.

In a bowl, mix 2 c. powdered sugar, 1 tsp. vanilla extract, maple syrup, and enough milk until the mixture is smooth and at a drizzle-able consistency.


To assemble:
Pipe about 2-3 Tbl. of mousse into each pie crust shell. Drizzle the tarts with the maple icing.

Monday, November 8, 2010

Pumpkin Nanaimo Bars

So, you've probably noticed that my posting frequency has gone down. Substantially. Ironically enough, now that I actually have the funds to bake to my heart's content, I no longer have the time. Yup, that's right. I got a job. I'm now the resident baker at a private school in my town. The school previously did most of their baking from store-bought mixes, and they hired me to transition it more toward from-scratch baking! Sweet! The head chef also allows me a lot of freedom to try new recipes, so if there's something we need to make, he encourages me to bring in my own favorite recipe and to tweak it to fit my tastes! It's mostly breakfast baking--muffins, scones, eventually biscuits and quick breads--but there is some dessert baking, too. I made 500 pumpkin chocolate chip cookies for the kiddos last Friday!

So, while I am really excited to have this job and am really enjoying it, the fact that I work 75 hours a week between my two jobs is kind of cutting into my baking time. Phooey. I promise not to abandon you completely, though, faithful readers (all ten of you). And thus, I bring you this recipe. A fall twist on a traditional Canadian dessert. And boy, were they good! I mean, pumpkin and chocolate? Trust me, people...you WANT to make these. They're rich, though, so cut them small (we're talking 36-pieces-out-of-an-8x8-pan rich).


Pumpkin Nanaimo Bars (adapted from The Eclectic Cook)

  • 1 c. plus 2 Tbl. butter, softened, divided
  • 1/4 c. granulated sugar
  • 5 Tbl. cocoa powder
  • 1 egg
  • 1 1/4 c. graham cracker crumbs
  • 1/2 c. finely chopped almonds
  • 1 c. unsweetened coconut
  • 3 Tbl. heavy whipping cream
  • 2 Tbl. instant vanilla pudding mix
  • 2 c. powdered sugar
  • 1/4-1/2 c. pumpkin puree
  • 1-2 tsp. pumpkin pie spice
  • 4 oz. semi-sweet chocolate chips

Combine 1/2 c. butter, granulated sugar, and cocoa powder in small saucepan. Heat over medium-low heat until the sugar is melted and the mixture comes to a boil. Remove from heat and slowly drizzle into the beaten egg, whisking constantly until the mixture thickens. Stir in the graham cracker crumbs, almonds, and coconut. Press the mixture into the bottom of a well-greased 8x8- or 9x9-in baking pan. Let cool while you prepare the next layer.

Beat 1/2 c. butter until smooth. Beat in whipping cream, vanilla pudding mix, powdered sugar, pumpkin puree, and pumpkin pie spice until well-mixed and smooth. Feel free to adjust the amounts of pumpkin, powdered sugar, and pumpkin pie spice to your own taste. Spread this layer evenly over the cooled crust. Chill in the fridge until firm, while you prepare the third layer.

Melt chocolate chips and butter together (I prefer the microwave, but feel free to use a double boiler). Pour this over the top of the middle layer, and spread it so that it evenly covers the middle layer. Chill in the fridge until firm. Remove from fridge about a half hour before cutting so that the top chocolate layer can soften up a little (making it less likely to crack while cutting it). Devour.

Saturday, October 23, 2010

What's Baking: Caramel Apple Cupcakes


So, I joined a baking challenge! It's called What's Baking?, and it's made up of bakers from the What's Cooking board on the Nest. October's theme was fall-themed cupcakes, which I thought was an excellent idea! I needed to bake cupcakes anyways for birthday celebrations at my dance studio, so I just needed to make sure they were fall-themed.

Now, what I'm about to say might not go over so well. I'm just warning you. As much as I like pumpkin, I kind of wanted a change from all the pumpkin treats I've been making. There, I said it. Growing up in Western NY, one of my favorite things about fall was going apple-picking, and I LOVE apples! I hadn't done any baking with apples this fall, so I thought apple cupcakes would fit the What's Baking theme well. And then I saw these. Caramel apple cupcakes. Yummmmm!

I must admit, I was skeptical about the cake portion, since they were a Rachel Ray recipe, and she is constantly joking about her inability to bake on 30 Minute Meals, but one of her testers must have developed these, because they were great! Light and fluffy, with great flavor! The cupcakes were a huge hit with kids and adults alike. I got 18 out of this recipe.


Caramel Apple Cupcakes (from Chi-Town Cooking Creations)

Cupcakes

  • 2 1/2 c. all-purpose flour
  • 4 tsp. baking powder
  • 1 tsp. cinnamon
  • 1 tsp. salt
  • 4 eggs
  • 1 c. packed brown sugar
  • 1 c. granulated sugar
  • 1 c. canola oil
  • 4 tsp. vanilla extract
  • 4 apples, peeled and shredded (a tart variety, like Granny Apple, would be best)

Sift together the first 4 ingredients. In a large bowl, mix together the eggs, sugars, and vanilla extract, then whisk in the oil. Add the dry ingredients to the wet, and stir until just combined. Stir in the shredded apples.

Using an ice cream scoop, fill greased muffin pans with the cupcake batter. Bake at 350 degrees for 25-30 minutes, or until a toothpick inserted in the center comes out clean. Cool.

Caramel Sauce

  • 1 stick butter
  • 1 c. packed brown sugar
  • 14 Tbl. heavy cream
  • 1/4 tsp. vanilla extract
  • Pinch of salt

Melt the butter in a saucepan over medium heat. Add the sugar, and cook, stirring occasionally, until sugar melts and begins to boil. Remove from heat and stir in remaining ingredients until smooth. Cool completely.

Caramel Buttercream

  • 2 sticks butter, softened
  • 1/3 c. caramel sauce (see recipe above)
  • 1 1/2 tsp. vanilla extract
  • 2 Tbl. heavy cream
  • 2-4 c. powdered sugar
Cream the butter until smooth. Mix in the caramel sauce (hint: spray the measuring cup with cooking spray before measuring out the caramel so that it will come out easier). Mix in 1 c. powdered sugar. Mix in the vanilla extract and heavy cream. Add an additional 1 c. powdered sugar, or until the consistency is correct. I actually had to add some additional cream because my caramel was cold and the frosting was very stiff.


To assemble:

Using a paring knife, cut a plug about 1" in diameter out from the top of each cupcake. You want it to be about 1" deep, too, so that it doesn't go all the way through to the bottom of the cupcake. Use the remaining caramel sauce to fill each cavity. Frost with the caramel buttercream.

Monday, October 18, 2010

Pumpkin Cheesecake

So, last Sunday was supposed to be my wedding day. Yup, I was supposed to be one of those 10/10/10 brides. Then my (ex-) fiance decided he didn't want to marry me. Silly him. My wedding cake was supposed to be a pumpkin swirl cheesecake. I decided that not getting married was not a good enough reason to not eat cheesecake (did you follow that, with all the nots?). So, I made my own!


Two of my best friends came in from out-of-town to visit and to cheer me up that weekend, and one of them has Celiac's. I wanted to make sure she would be able to enjoy the dessert (and other foods!) I cooked up for our celebratory bbq, so I made the crust for this cheesecake with gluten-free gingersnaps. You could certainly leave off the crust altogether or substitute a different gluten-free crust if you can't find gluten-free gingersnaps. Or, if it isn't something you have to worry about, use real gingersnaps!

Also, may I just say, this recipe is extremely forgiving. I did not read the original recipe thoroughly before starting, so I missed the part when the crust is supposed to chill for an hour. And the part where you add the sour cream topping right after baking and before cooling, rather than after the cheesecake has set in the fridge overnight. No matter. It tasted fine, anyways. And I'm sure your texture will be much better than mine was, given that I mixed this up by hand since my stand mixer broke last weekend. *Sigh* As I said, it's very forgiving, since it still tasted fantastic!

I did try to get a picture of the whole, uncut cheesecake, but given the line of bottlecaps in the picture and the lack of focus, the drinking had proceeded too long to get a decent picture. The other picture was taken a few days later, while sober, and, as you saw, it's MUCH better!


Bourbon Pumpkin Cheesecake (Adapted from Apple A Day)

Crust

  • 3/4 c. crushed gingersnaps (gluten-free or normal)
  • 1/4 c. finely chopped pecans
  • 1/4 c. brown sugar
  • 4 Tbl. unsalted butter, melted
  • 1 Tbl. bourbon (I subbed Jameson, since I was out of bourbon)

Pulse together crushed gingersnaps, pecans, butter, and bourbon (or Jameson) in a food processor until moistened and starting to come together. Press into the bottom of a 10" springform pan. Chill 1 hour (or don't, since I forgot this step). Bake the unfilled crust for 10 minutes at 350 degrees F.

Filling

  • 2 c. pumpkin puree
  • 4 eggs
  • 2 tsp. cinnamon
  • 2/3 tsp. nutmeg
  • 2/3 tsp. ginger
  • 2/3 tsp. salt
  • 2/3 c. brown sugar
  • 2/3 c. granulated sugar
  • 4 (8-oz) packages cream cheese, softened
  • 3 Tbl. heavy cream
  • 1 1/2 Tbl. cornstarch
  • 1 1/2 tsp. vanilla
  • 1 1/2 Tbl. bourbon (or Jameson)

In a large bowl, beat the cream cheese until creamy. Cream the granulated sugar with the cream cheese. Beat in the eggs, one at a time, until thoroughly combined. In a separate bowl, mix the pumpkin puree with the spices and salt. Add this to the cream cheese mixture, and beat until thoroughly incorporated. Beat in the brown sugar, vanilla, and bourbon. Dissolve the cornstarch in the heavy cream, and beat this into the cream cheese mixture until the batter is smooth.

Pour the filling into the pre-baked crust. Wrap the springform pan in a double layer of heavy-duty aluminum foil and place in a water bath (or don't, since you're going to put a topping on it anyway that will hide any cracks). Bake for 65 minutes at 350 degrees F, or until center is just set. Without removing from the pan, let cool for 5 minutes.

Topping

  • 2 c. sour cream
  • 2 Tbl. granulated sugar
  • 1 Tbl. bourbon (or Jameson)

Mix all topping ingredients until thoroughly combined. Spread over the top of the (still hot) cheesecake. Return the cheesecake to the oven and bake for 5 more minutes at 350 degrees F. Or, if you neglect to read the directions and cool the cheesecake completely, top the cooled cheesecake with sour cream and bake at 350 degrees F for 15 minutes. Let the cheesecake cool in the oven for 2 hours. Once it is somewhat cooled, refrigerate until it's time to serve (at least 4 hours, but preferably overnight). Feel free to decorate it with whole pecans, if you have any on hand (I didn't).

Friday, October 15, 2010

Pumpkin Blondies

We're continuing the pumpkin obsession here. I have pumpkin blondies for you today, and I have one other post ready to go on a different pumpkin dessert. Plus, there's still one more 29-oz can of pumpkin sitting in my pantry. Think I'll have any trouble using it before the season is over? Nah, me neither.

The blondies my mom always made were very much like a bar cookie--dense and chewy, not cake-like at all. I'm coming to learn that perhaps other people may understand other things as blondies...the first indication of this was when my white chocolate blondies turned out cakey. Then, someone asked on What's Cooking the other day for pumpkin blondies that weren't cakey...and didn't get many helpful replies. Hmmmm. So I looked at the picture in my source recipe, and I was suspicious. The looked like they could go either way. After looking at my mom's blondie recipe, I decided to make a couple edits to the pumpkin blondies recipe to try to make them denser and less cakey. I was partially successful. This is what comes from playing around with baking chemistry without fully understanding it. These were definitely dense enough, but still had more of a cakey texture, rather than a chewy texture. I guess I'll just have to keep baking test batches until I get it right. Darn.


Pumpkin Blondies (Adapted from Annie's Eats)

  • 2 c. all-purpose flour
  • 1 Tbl. pumpkin pie spice (or eyeball a mixture of cinnamon, cloves, ginger, and nutmeg)
  • 1/4 tsp. baking soda
  • 3/4 tsp. salt
  • 16 Tbl. unsalted butter, melted
  • 1/2 c. brown sugar
  • Heaping 1/2 c. white sugar
  • 1 egg
  • 2 tsp. vanilla extract
  • 1 c. pumpkin puree
  • 1 c. white chocolate chips
  • 1 c. butterscotch chips
  • 1/2 c. toasted chopped pecans

Sift together flour, spices, baking soda, and salt. In a medium bowl, mix together melted butter and sugars. Stir in egg and vanilla extract. Next, stir in the pumpkin puree until well-combined. Add the sifted dry ingredients, and stir just until combined. Finally, stir in the white chocolate, butterscotch chips, and pecans.

Pour the batter into a greased 9x13-in baking dish, and bake at 350 degrees for 35-40 minutes, or until a toothpick inserted into the center comes out clean.

Wednesday, October 6, 2010

Outrageous Mile-High Reese's Cake


This should be on the website This Is Why You're Fat. It should also be on your plate. See, when my friend requested a Reese's cake for her birthday, I thought about the ones I'd seen other bloggers make--chocolate cake with peanut butter frosting. Good, sure, but not really very Reese's-like. I mean, the peanut butter-to-chocolate ratio is way off. I started thinking about how to remedy this. And then it hit me. Have you seen the Cheesecake Factory's Ultimate Red Velvet Cheesecake? It's layers of cheesecake alternating with layers of red velvet cake. Do you see where this is going, now?


A peanut butter cheesecake, sandwiched between layers of chocolate cake, all iced in peanut butter frosting, and topped with chocolate ganache. Oh yes. I went there. It has the right chocolate-to-peanut butter ratio, and it's chocolate outside, just like a Reese's. This, my friends, is the Outrageous Mile-High Reese's Cake, and it is not for the faint of heart. I apologize for the messy pictures, but it's hard to get food staged nicely at a party with lots of hungry people clamoring for cake! :)

Outrageous Mile-High Reese's Cake

Chocolate Cake (my grandmother's recipe)

  • 3/4 c. unsalted butter
  • 3 oz. semi-sweet chocolate
  • Heaping 2 c. sugar
  • 3 eggs
  • 2 c. flour
  • 2/3 c. cocoa powder
  • Heaping 2 tsp. cream of tartar
  • 1 1/2 tsp. salt
  • 3/4 c. milk
  • 1 1/2 tsp. vanilla
  • 3/4 c. boiling water
  • Heaping 2 tsp. baking soda

Melt chocolate and butter together in a large bowl. Stir in sugar, then stir in eggs, one at a time, until well-combined. Meanwhile, sift together flour, cocoa powder, cream of tartar, and salt. Add sifted ingredients to chocolate mixture in two batches, alternating with the milk and vanilla. Stir until just combined. Add the baking soda to the boiling water OVER THE BOWL, pour the mixture into the batter, and stir it in.

Pour the batter into a greased 10-in. springform pan, and bake for 35-40 minutes at 350 degrees F, or until a toothpick inserted in the center comes out clean. Cool.

Peanut Butter Cheesecake (adapted from Allrecipes.com)

  • 4 (8-oz) packages of cream cheese
  • 1 1/2 c. peanut butter
  • 1 1/4 c. granulated sugar
  • 3 Tbl. all-purpose flour
  • 1 1/4 tsp. vanilla extract
  • 3 eggs
  • 5 Tbl. half-and-half

Beat cream cheese and peanut butter together until smooth and creamy. Beat in sugar, flour, and vanilla. Add eggs, and mix until thoroughly incorporated. Stir in half-and-half.

Pour the batter into a 10-in. springform pan, and bake at 375 degrees F for 40-50 minutes, or until edges are set but the very middle still jiggles slightly. Cool completely, then refrigerate until you're ready to assemble the cake.

Peanut Butter Frosting (from Ina Garten)

  • 2 c. powdered sugar
  • 2 c. peanut butter
  • 10 Tbl. unsalted butter, softened
  • 1 1/2 tsp. vanilla extract
  • 1/2 tsp. salt
  • 2/3 c. heavy cream

Cream together butter and peanut butter. Stir in vanilla extract and salt. Add powdered sugar and heavy cream, alternating between the two, and stir until smooth and creamy.

Chocolate Ganache (adapted from Allrecipes.com)

  • 9 oz. semi-sweet chocolate
  • 1 c. heavy cream
  • 1 Tbl. Kahlua
Heat the cream just until it bubbles. Pour over chocolate, and let it stand for 5 minutes. Stir until smooth. Add Kahlua, and stir until incorporated. Let cool until thickened but still pourable.


To assemble:

Level out the chocolate cake, and slice it horizontally into two equal layers. Place one layer on a 10-in. cake round. Spread the top of the layer with a thin layer of the peanut butter frosting. Top with the cheesecake. Frost the top of the cheesecake with a thin layer of the peanut butter frosting. Top with the second layer of chocolate cake. Frost the top and sides of the cake with the peanut butter frosting. The nice part is that the frosting doesn't have to be perfect, since it will get covered in chocolate ganache! Transfer the cake to a cooling rack placed over a jellyroll pan lined with waxed paper. Pour chocolate ganache over the top of the cake, until it spills over onto the sides. Spread it evenly over the sides of the cake so that the whole thing is covered in ganache. You can save any ganache that drips onto the waxed paper and reuse it. If desired, decorate the cake with Reese's cups. Refrigerate until serving.

Sunday, October 3, 2010

Pumpkin Whoopie Pies

It's October! And that means I can legitimately start making pumpkin desserts--yay!!! See, I love anything pumpkin. Actually, I love most things associated with October and the fall. It might have something to do with the fact that my birthday is on Halloween, and my parents used to always call me their little pumpkin. But that's just a guess. In any case, I plan on making probably one pumpkin dessert a week during October, so we'll all get our fill of pumpkin goodies. And it all starts with these pumpkin whoopie pies. They were an excellent way to kick off the month! I brought them to Movie Night at my dance studio, and they were a huge hit! People couldn't stop raving about them! So, do yourself a favor, and make these next time you'd like a pumpkin treat!


Pumpkin Whoopie Pies (adapted from Martha Stewart)

  • 3 c. all-purpose flour
  • 1 tsp. salt
  • 1 tsp. baking powder
  • 1 tsp. baking soda
  • 2 Tbl. ground cinnamon
  • 1 Tbl. ground ginger
  • Scant 1 Tbl. ground cloves
  • 2 c. packed brown sugar
  • 1/2 c. vegetable oil
  • 3 1/2 c. pumpkin puree
  • 2 eggs
  • 2 tsp. vanilla extract, divided
  • 3 c. powdered sugar
  • 1/2 c. unsalted butter, softened
  • 8 oz. cream cheese, softened

Sift together the first seven ingredients, flour through cloves. Don't be scared of the large quantities of spices. These have the perfect amount of spice to them--seriously. In a large bowl, mix together the oil and brown sugar. Stir in pumpkin puree. Stir in eggs and 1 tsp. vanilla until thoroughly combined. Add sifted dry ingredients, and stir just until combined.

Using a medium cookie scoop (1 1/2 Tbl. capacity), scoop dough out onto a cookie sheet lined with parchment paper. Leave an inch or so between cookies. Bake at 350 degrees for 15 minutes, or until a toothpick inserted into the center comes out clean. Cool.

In a medium bowl, beat butter until creamy. Add cream cheese and 1 tsp. vanilla, and beat until combined and smooth. Add powdered sugar, and beat until combined and creamy. Pipe the frosting onto the flat side of half of the cookies, then top each with an unfrosted cookie, forming a sandwich. Devour.

Note: Martha's recipe says it makes 12. I wasn't sure 12 would be enough, so I debated doubling it. I'm really glad I didn't, because I got 22 good-sized whoopie pies out of the recipe!

Tuesday, September 28, 2010

Orange Cranberry Bread

This is somewhat of a departure from desserts. But, it's baked, so I think it can still be posted. I made some orange cranberry muffins for my mom a while back, but I wasn't that pleased with the texture of them, and I still had some leftover ingredients. I always seem to have more luck with yeast breads than quick breads (go figure, right???), so I thought of making an orange cranberry bread. I looked at this cinnamon raisin bread recipe for inspiration, but I HEAVILY adapted it and made enough changes that I feel comfortable labeling this an original recipe. This bread is moist, light in texture, and heavy on flavor! It's nice and hearty because of the copious add-ins and would make a great breakfast! Please enjoy!


Orange Cranberry Bread (a Blondie original)

  • 1/3 c. warm water (110 degrees F)
  • 4 Tbl. honey, divided
  • 2 tsp. yeast
  • 3 Tbl. butter, softened
  • 1 egg
  • 1/4 tsp. salt
  • 2 2/3 c. bread flour, divided
  • 1/2 c. plus a little more thawed orange juice concentrate, divided
  • Ground cinnamon
  • Ground cloves
  • Ground nutmeg
  • 1/4 c. brown sugar
  • 1/2 c. chopped walnuts
  • Handful dried cranberries
  • Handful golden raisins
  • Melted butter (optional)

Mix the warm water with 1 Tbl. honey in a large bowl. Sprinkle the yeast over this and let proof until foamy, about 5-10 minutes.

Whisk remaining honey, butter, egg, and salt into the yeast mixture until pretty thoroughly mixed. If you still have some lumps of butter, that’s ok. Add 1 c. bread flour, and whisk until the mixture is smooth and no lumps remain. Whisk in 1/2 c. thawed orange juice concentrate. Using a spoon (it’ll get too thick to whisk), stir in remaining flour a little at a time until dough pulls away from the edge of the bowl. Turn it out onto a lightly-floured surface and knead until smooth and elastic, about 10 minutes, adding more flour as necessary to prevent sticking.

Coat a large bowl with cooking spray. Form your dough into a ball and coat it in cooking spray. Put the dough into the bowl and cover the surface of the dough with plastic wrap. Let rise in a warm place for 1 hour, or until doubled.

On a lightly-floured surface, roll out the dough into a rectangle that is 1/2-in. thick and 9-in. wide (it will end up being about 11 to 12-in. long). Brush the dough with a little more thawed orange juice concentrate, just to moisten it. Sprinkle liberally with cinnamon, lightly with cloves, and very lightly with nutmeg. Sprinkle the brown sugar over the dough. Sprinkle the dough with the walnuts, cranberries, and raisins, distributing them evenly. Roll up dough jelly-roll style, TIGHTLY, folding in the ends. Place in a well-greased 9x5-in. loaf pan. At this step, you can either put it in the fridge to rise overnight, or put it in a warm place to rise for an hour. If you let it rise overnight in the fridge, be sure to let it sit at room temperature for about a half hour to warm up before baking.

Bake at 350 degrees F. for 30 minutes, or until the bread is lightly browned on top and sounds hollow when knocked. You can brush the top with melted butter at this point to ensure a soft crust, but my house is super humid and things always get soft anyways, so I didn’t.

This would also be fantastic topped with a glaze of powdered sugar and orange juice concentrate, but it's not necessary.

Friday, September 24, 2010

Sour Cream Pear Pie

Yes, I know that sounds weird. I got lots of skeptical looks when I told people there was sour cream in the pie. But once they tried it, they were converted into believers! This pie was deliciously creamy. It was similar in flavor to apple pie, but ever-so-slightly (and delightfully!) different. So go ahead, take a risk, and try it! I promise you'll be pleasantly surprised!


Sour Cream Pear Pie (adapted from Allrecipes.com)

  • 1 unbaked 9" pie crust (I used Martha's Perfect Pie Crust, as posted by Apple A Day)
  • 8 small to medium pears, thinly sliced (it would be nice to peel them if you are less lazy than me)
  • 1/3 c. granulated sugar
  • 3/4 c. all-purpose flour, divided
  • 1 c. sour cream
  • 1/2 tsp. lemon juice
  • 1/2 tsp. vanilla extract
  • 1/2 tsp. almond extract
  • 1 Tbl. cinnamon, divided
  • 1/4 c. packed brown sugar
  • 2 Tbl. butter, melted

Put your pears in a gallon-sized zip-top plastic bag. Add granulated sugar, sour cream, lemon juice, vanilla and almond extracts, 1/2 Tbl. cinnamon, and 2-4 Tbl. all-purpose flour, depending on how juicy they are. Zip the top (double-check to make sure it's closed, because you don't want to accidentally dump out half your pears! Not that this happened to me, or anything....), and shake and massage around until everything is thoroughly mixed. See how we cleverly avoided dirtying a bowl to mix that up???

Line a 9" pie plate with the crust, trimming the excess from the edges. Dump the pear mixture into the pie plate, along with as much of the juices as you can get out of the bag. Don't worry about making it pretty, because we're going to cover it up with a crumb topping.

Mix together 1/2 c. all-purpose flour, the brown sugar, 1/2 Tbl. cinnamon, and the melted butter until you have pea-sized crumbs. Sprinkle this generously over the top of the pie. Bake at 400 degrees F for 10 minutes, then turn down the heat to 350 degrees F, and bake another 45 minutes. Cover the crust with foil for the last 10 minutes or so, if needed, to prevent over-browning.

Wednesday, September 22, 2010

Lego Cake!

Remember my piano cake? Well, I've made another foray into shaped cakes. This one was for my friend's son's 5th birthday. He apparently really likes Legos (and really, who can blame him? I used to love those things!), so his party was Lego-themed. Naturally, he needed a Lego-shaped cake. I followed this tutorial from Betty Crocker, and it worked out very well! I used my grandmother's chocolate cake recipe (ever-so-slightly adapted) and a basic American buttercream frosting. I also tried out my Americolor gel food colorings for the first time, and they worked great to get bright, vibrant colors for the frosting!

My Grandmother's Chocolate Cake (slightly adapted)

  • 1/2 c. unsalted butter
  • 2 oz. semi-sweet chocolate
  • 2 eggs
  • 1 1/2 c. granulated sugar
  • 1 1/2 c. flour
  • 1/4 c. cocoa powder
  • 1 1/2 tsp. cream of tartar
  • 1 tsp. salt
  • 1/2 c. milk
  • 1 tsp. vanilla
  • 1/2 c. boiling water
  • 1 1/2 tsp. baking soda

Melt the butter and chocolate together in a large, microwave-safe bowl. Stir to combine, then mix in the sugar. Next, beat in the two eggs. Separately, sift together flour, cocoa powder, cream of tartar, and salt. Add this to the chocolate mixture, alternating with the milk and vanilla. Finally, add the baking soda to the boiling water OVER THE BOWL (mixture will foam up), and stir it in just until combined.

Pour the batter into a greased 9x13" pan (I also lined the bottom with parchment paper, just to ensure that there wouldn't be stickage!), and bake at 350 degrees F for 30-35 minutes, or until toothpick inserted into the center comes out clean. Let cool.

Magnolia Bakery Vanilla Buttercream (from Martha Stewart)

  • 2 sticks butter, softened
  • 6 c. powdered sugar
  • 2 tsp. vanilla extract
  • 1/4 c. milk
  • Gel food coloring

Beat the butter for a few minutes, until nice and creamy. Add the powdered sugar a little at a time, alternating with the vanilla and milk, until the desired consistency is achieved. You may need more milk or more powdered sugar. Next, divide the frosting equally into three separate bowls. Take one of those bowls, and transfer half of the frosting from it to a new bowl. You should now have four bowls, two of which contain twice as much frosting as the other two. Add food coloring of your choice to each bowl, and stir to combine.


To assemble cake:

  • 1 9x13" cake
  • 1 batch of Magnolia Bakery Vanilla Buttercream
  • 1 bag jumbo marshmallows

Remove cooled cake from the pan and freeze for an hour. Put it on a clean surface with the long side facing you. Cut it width-wise into three equal rectangles--each should be about 9" x 4". Take one of these rectangles, and cut it in half width-wise, so you have two equal squares. You should now have two rectangles and two squares (do the frosting proportions make sense, now?). The squares will be 4-peg pieces, and the rectangles will be 8-peg pieces.

Frost a thin crumb-coat onto each piece, using a different color for each piece of cake (use the colors you have more of for the rectangular pieces and the colors you have less of for the square pieces). Return the cake pieces to the freezer for another hour to set the crumb coat.

Put the final layer of frosting onto each of the pieces, smoothing it out as much as possible, and reserving a little frosting of each color. Now would be the time to arrange your pieces on a cake board, stacking them (or not) however you like.

Take the bag of jumbo marshmallows, and snip a few in half so that they will be shorter. Spear one on a fork. Using your reserved frosting, frost the top and sides. Carefully transfer it to the cake piece of the same color, and fix up the frosting, if need be. Remember, you need four for the square pieces and eight for the rectangular pieces (assuming they are all unstacked--this will need to be modified if you are stacking pieces). Repeat until you have put sufficient pegs on all the cake pieces. Then, present it to a 5-year-old boy, and make his day! :)

Monday, September 20, 2010

Another Pictureless Post...

Sorry guys, another pictureless post. This is the last one, I promise. But I really wanted to share this one--it's a Blondie original! And that made me excited. I had friends over to watch a movie (Sherlock Holmes--very good!). I made a small selection of goodies for them to munch on, including a veggie tray with homemade hummus, Joelen's crab rangoon appetizers, and these pear cigars. I have no idea what to call them, but pear cigars sounds as good as anything else. They were light, tasty, and not too sweet!

Pear Cigars (A Blondie original!)

  • 4 medium to large pears
  • 1 Tbl. lemon juice
  • 1/2 tsp. ground ginger
  • 3 Tbl. honey
  • 2 Tbl. cornstarch
  • 1 package filo dough, thawed
  • 1/2 stick butter, melted

Slice the pears up nice and thinly (a mandoline works well for this). Peeling them before slicing would probably be nice, but I was lazy and didn't do it, so feel free to omit that step. Put about 1/2 in. of water in the bottom of a medium saucepan, and add the pears. Add lemon juice, ginger, and honey, and stir to evenly coat pears. Bring to a boil, then reduce the heat and simmer covered for about a half hour, or until pears are tender. Mix the cornstarch with about 2 Tbl. cold water until dissolved and smooth. Add the cornstarch slurry to the pears, and stir to combine. Simmer 1 minute longer, or until thickened. Let the pear mixture cool.

Take one sheet of filo dough, and brush with melted butter. Top it with another sheet of filo dough. Brush with melted butter again. Fold the filo stack in half, like a book (hint: the filo stack should NOT be long and skinny...if it is, you folded it in half the wrong way. Unfold and try again). Brush with butter again. Spoon 2-3 Tbl. of pear mixture along the folded edge. Do NOT go all the way to the edge with the filling. Roll the filo dough over the pear mixture once, then fold in the sides (like wrapping a burrito) and continue rolling until you reach the end of the filo sheet. Your cigar should have all the ends tucked in so as to minimize the chance of tasty filling leaking out. Place the cigar seam-side down on a greased baking sheet. Repeat this whole process until you've used all the pear filling. It should make around 18 cigars.

Bake the cigars at 375 degrees for 30-35 minutes, or until golden. Enjoy!

Thursday, September 16, 2010

Thumbprint Cookies

I have a couple posts that I've been debating the wisdom of posting. One, macarons, is because while tasty, they in no way resembled the pretty macarons you see at bakeries, so I don't really feel qualified to give instructions on how to make them. The others are because I don't have pictures for them. But then I realized that my pictures are pretty crappy, anyways, so I don't think you'll miss them that much. These thumbprint cookies are too tasty not to make, even without a picture! I mean, the recipe is from Ina Garten--do you need any more proof that it will be good???

I did the backstage catering for a friend at an event last weekend, and these thumbprint cookies were one of the desserts I made. They were a big hit! The other dessert was David Lebovitz's Chewy Dense Brownies. I told you it was a new favorite recipe! Remember how good they were in S'mores Brownies? Turns out, they're just as good (if not better!) if you make the brownie base, stir in a package of Reese's chips, and top them off with a drizzle of melted peanut butter candy melts after they're baked and cooled. Oh yes. I highly encourage trying that!

Thumbprint Cookies (from Ina Garten)

  • 3 sticks unsalted butter, softened
  • 1 c. sugar
  • 1 tsp. vanilla extract
  • 3 1/2 c. all-purpose flour
  • 1/4 tsp salt
  • 1 egg beaten with 1 Tbl. water
  • 7 oz. unsweetened flaked coconut
  • Various flavors of jam

Cream together the butter and sugar. Beat in vanilla. Sift together salt and flour, then add this to the butter/sugar mixture. Mix just until it comes together. Turn the dough out onto a piece of plastic wrap. Pat it into a flat disk, then wrap up in the plastic wrap and refrigerate for 30 min.

Roll dough into balls approximately 1 1/4" in diameter. Roll in the egg wash, then roll in coconut. Place the ball on a greased baking sheet. Using your thumb, press a nice, DEEP indentation into the cookie. These flatten out a lot when baking, so I recommend making the sides of the well pretty high! Once you've got all the cookies formed, pipe jam into the wells of the cookies. Use your favorite flavors--I used lemon marmalade, cherry jam, apricot jam, and some strawberry pie filling that I had left over. Refrigerate for another 30 min (I'm adding this step in the hopes of preventing the cookies from flattening out too much). Bake for 20-25 min. at 350 degrees F.

Next time I make these, I'm totally making a rum-pineapple filling for them so they'll be pina colada cookies!!!

Wednesday, September 8, 2010

Tiramisu

My dance studio recently had a big party that was catered by a local pasta shop. They wanted to charge something like $2.75 per person to include dessert, and I thought I could probably do it for less than that--not to mention, it would probably taste better, too! I wanted to keep with Italian food to match dinner, and I wanted something that could be assembled ahead of time. Tiramisu seemed to fit the bill perfectly! No one believed me that I made this--they all thought it was too professional-looking, too perfect-tasting, and had to be from the catering company. Nope! And you, too, can make a delicious, impressive tiramisu. Read on for the recipe! (My apologies for the pictures, but tiramisu is not particularly photogenic)


Tiramisu
(adapted from Allrecipes.com)

  • 9 egg yolks
  • Heaping 1 c. granulated sugar
  • 1 c. milk
  • 2 c. heavy whipping cream
  • 1 tsp. vanilla extract
  • 1 1/2 lbs mascarpone cheese, at room temperature
  • 1 1/2 c. strong coffee, at room temperature
  • 6 Tbl. rum
  • 3 (3-oz) packages of soft lady fingers
  • Cocoa powder, for dusting

Bring about an inch of water to a boil in a medium pot. In a stainless steel bowl, combine egg yolks, sugar, and milk, and whisk until combined. Put the bowl on top of the pot of boiling water, making sure the water does NOT touch the bottom of the bowl. Cook, stirring constantly, until mixture thickens and becomes lighter in color (and/or reaches 160 degrees F). Remove bowl from heat, press zabaglione through a fine mesh sieve to remove lumps, and cover with plastic wrap, pressing the plastic wrap against the surface of the zabaglione to prevent a skin from forming. Refrigerate 1 hour. Then, fold the mascarpone into the zabaglione until combined.

In a medium bowl, beat whipping cream with vanilla until stiff peaks form. Refrigerate until ready to use.

In a small bowl, combine coffee and rum. Line a 9x13" baking dish with a single layer of lady fingers. Drizzle about half of the coffee mixture over them. Spread with half of the mascarpone/zabaglione mixture, then spread with half of the whipped cream. Top with a second layer of lady fingers. Drizzle with remaining coffee mixture. Spread with remaining mascarpone/zabalione, then spread with remaining whipped cream. Refrigerate at least 24 hours, and preferably 48 hours, before serving. Before serving, use a mesh sieve to sift a fine dusting of cocoa powder over the top.


Notes: this was amazing. Terrible for you, rich, delicious, time-consuming, and decadent. I can't stop raving about it--seriously! The best part is that it's not overly sweet. It is absolutely essential to make this two days before serving it--the flavors all meld into a fantastic conglomeration of taste. The original recipe said to cook the egg yolks over direct heat and boil them, and--against my better instincts--I followed it. I ended up with a somewhat grainy zabaglione because the eggs started to scramble. I have updated the directions to reflect a more gentle cooking method. The original recipe also said to dip the lady fingers in the coffee mixture, but they fell apart on me doing that, so I used the drizzle method instead. Oh, and speaking of the coffee, use a nice, strong, rich-flavored coffee. I'm not a coffee drinker, so I used instant coffee that my roommate had on hand--I think the flavor would have been better with better coffee. One last advantage to this recipe--the zabaglione is cooked, so there's no raw eggs in sight, like there are in a lot of tiramisu recipes!

Sunday, September 5, 2010

S'mores Brownies

A while back, I made s'mores brownies for a family reunion, but I only mentioned it in passing because I a) followed the source recipe exactly, and b) wasn't completely 100% satisfied with how they turned out (sorry, Melissa!). But they had enough potential to be worth revisiting the idea. I knew there would be a lot of kids in attendance at my parish's annual picnic, and since the s'mores brownies had been a big hit with the kids at the family reunion, they seemed like a logical choice. For the record, this latest batch was both kid- and adult-approved! And I now have a new favorite brownie recipe. Yum!


S'mores Brownies (brownie base from David Lebovitz via Smells Like Home)

  • 1/2 box graham crackers, thoroughly crushed
  • 3 sticks butter, divided
  • 8 oz. semisweet chocolate chips
  • 2 1/2 c. sugar
  • 4 eggs
  • 2 tsp. vanilla extract
  • 1 c. flour
  • 1/2 bag mini marshmallows

Preheat oven to 350 degrees F. Put one stick of butter in a 9x13" pan, and put it in the oven to melt while the oven preheats. Meanwhile, pulverize the graham crackers in a food processor or with a rolling pin and elbow grease. Add the graham cracker crumbs to the melted butter in the pan, and stir until all crumbs are moistened. Press crumbs evenly over pan to form a crust. Bake in preheated oven for 10-12 minutes, or until mostly firm. Cool.

Meanwhile, combine remaining 2 sticks butter and semisweet chocolate in a large, microwave-safe bowl. Zap in 30 second-intervals on high power until chocolate and butter are melted. Stir in granulated sugar, then stir in eggs--one at a time--and vanilla. Stir in flour just until mixed in.

Spread batter over the graham cracker crust, and bake at 350 degrees F for 45 minutes, or until mostly done (toothpick inserted 1" from edge should have moist crumbs on it). Scatter mini marshmallows over top, and bake for another 5-7 minutes, or until marshmallows are puffed and starting to brown on top. If they don't brown up nicely, you can turn on the broiler, but watch them closely--they only take a minute or less to brown up that way!

These were fantastic, and I cannot stop raving about this brownie recipe! It's chewy and fudge-y and rich and decadent! In short, everything I love in a brownie. And it beats the pants off Duncan Hines!

Wednesday, September 1, 2010

Eat, Pray, Love Party: India

Ok, I've kept you waiting long enough. It's about time I coughed up the recipe for Nariyal Burfi, otherwise known as Indian Coconut Fudge. Truth be told, I was tweaking it. You see, I made the recipe (more or less) as directed. And it was tasty and delicious. But after about 5 minutes of being out of the fridge, it turned into a sticky gooey mess. Now, the obvious solutions to this problem were to a) always eat it straight out of the fridge or b) coat it in chocolate. Read on to see which I chose! ;)


Nariyal Burfi (Indian Coconut Fudge, adapted from Allrecipes.com)

  • 4 c. unsweetened dried flaked coconut
  • 2 (14-oz) cans sweetened condensed milk
  • Scant 1 c. sliced almonds
  • 1 Tbl. ground cardamom
  • Several dashes of rose water
  • 1 lb. chocolate coating bark

Combine the coconut and sweetened condensed milk in a large, microwave-safe bowl. Microwave on high for 8 minutes, stirring every 45 seconds, or until the mixture is thoroughly hot and bubbling. Remove from microwave, and stir in almonds, cardamom, and rose water. Pour into a well-greased 9x9" pan, and spread it out evenly. Refrigerate until firm (1-2 hrs.).

Cut into small squares (this stuff is rich!), and spread them out on a piece of waxed paper. Toss in the freezer for a few minutes to get nice and firm. Meanwhile, microwave the the chocolate bark in a small, microwave-safe bowl until melted, stirring every 30 seconds. Dip each square of fudge into the melted chocolate until completely covered, then transfer to a chilled baking sheet to harden. Enjoy!

I love the combination of flavors in the fudge. It's a little unexpected, because with the chocolate and coconut, you're expecting more of a traditional Almond Joy-type flavor, and instead you get the floral tastes of cardamom and rose water. But who doesn't enjoy a change of pace from time to time? And it certainly fit the bill for an Indian-inspired dessert! I hope you enjoyed the posts from my Eat, Pray, Love party--I know I had fun cooking, and my friends had fun eating!

Tuesday, August 31, 2010

We Interrupt Your Regularly Scheduled Programming...

Rest assured, the final installment of my Eat, Pray, Love recipes will be posted soon. However, in the meantime, I have a special treat for you! So, I'm terrible about following recipes. I mean, I CAN follow a recipe...I just usually DON'T. And sometimes, that makes me very, very, very happy. Because while I'm sure lemon tassies are delicious and all, they're just so *yawn* normal. Now, honey lemon lavender tassies, on the other hand, are anything BUT typical. They're unusual. And unexpected. And unique. And make you pause to go "hmmmm..." as you savor them. Now THAT'S my kind of dessert!


Honey Lemon Lavender Tassies

Crust (adapted from Dorie Greenspan via Smitten Kitchen)

  • 2 c. all-purpose flour
  • heaping 1/2 c. powdered sugar
  • 1 stick cold butter, cut into small pieces
  • 1 large egg plus 1 Tbl. of egg white

Pulse together flour and powdered sugar in a food processor until well-combined. Add the butter and pulse until the largest pieces are the size of peas. Add the egg and white and pulse in several long pulses to combine ingredients together.

Scrape out onto a piece of plastic wrap. Form the dough into a disk, wrap in plastic wrap, and refrigerate 1 hour. Spray a mini muffin pan with cooking spray. Roll out the dough on a well-floured surface to about 1/8-in thickness. Using a biscuit cutter, cut rounds out and press into the cups of the mini muffin pan to form mini crusts. Prick the bottoms with a fork (I like to make an "X"). Bake at 375 for about 12 minutes, or until golden brown and crisp. Cool completely.

Side note: this was the first pie crust I have ever made from scratch! Woohoo! So if I can do it, you can do it.

Honey Lemon Lavender Curd (adapted from Joy of Baking via The Way The Cookie Crumbles)

  • 4 large eggs plus one egg yolk
  • 1/3 c. lemon juice
  • 3 Tbl. lavender mead (I got mine from Hilltop Berry Farm)
  • 1/3 c. honey
  • 1/2 c. sugar
  • 6 Tbl. room temperature butter, cut into small pieces
  • Zest of 1 lemon

Fill a saucepan with about an inch of water, and bring to a simmer. In a stainless steel bowl, combine eggs, egg yolk, lemon juice, lavender mead, honey, and sugar. Whisk together. Place bowl over the saucepan (be sure the water is not touching the bottom of the bowl!), and cook, whisking constantly, until mixture thickens considerably and becomes pale in color (about 10 minutes).

Remove from heat and pour through a fine sieve into a small bowl. Whisk in the butter and lemon zest until butter has melted. Cover with plastic wrap, pressing the plastic wrap against the surface of the curd, and chill in the refrigerator until cool.

Note: if you have the misfortune of not living within driving distance to Hill Top, you could also probably increase the amount of lemon juice to 1/2 c., heat it gently, and steep some fresh lavender sprigs in it to infuse it with that lovely lavender aroma and taste.

Pipe the cooled curd into pre-baked, cooled mini tart shells, and enjoy!

Saturday, August 28, 2010

Eat, Pray, Love Party: Indonesia

Welcome to part 2 of my Eat, Pray, Love series. I'm going slightly out-of-order, here...the India post is not quite ready. So you can have Indonesia in the meantime. While it was easy to come up with Italian foods, being half Italian and having lived in Italy for just over a month, Indonesia was not so easy. I have no experience with Indonesian foods--I've never been there, and I have no friends who are from there, and there are no good Indonesian restaurants in my town. So I turned to good ol' Google. I kept coming across references to banana fritters eaten as a snack or dessert in Indonesia...and wouldn't you know it, trusty Allrecipes.com had a recipe! Actually, it had two, but true-to-form, I picked the one with alcohol in it. I have a reputation to uphold, here, people!


Pisang Goreng
(Indonesian Banana Fritters, adapted from Allrecipes.com)

  • 1 1/4 c. all-purpose flour
  • 2 Tbl. granulated sugar
  • 1 tsp. vanilla extract
  • 1/2 c. milk
  • 1 egg
  • 2 Tbl. butter, melted
  • 1 Tbl. rum
  • 4 almost-ripe bananas, sliced
  • Powdered sugar

Combine egg, milk, butter, and rum in a large bowl. Whisk until well-blended. Add flour and sugar, and whisk until incorporated. Fold sliced bananas into the batter.

Drop batter by tablespoon-full into 375-degree oil in a deep fryer or large saucepan. Deep-fry for 10-15 minutes, or until golden brown and crispy. Remove to paper towels to drain. Dust with powdered sugar to serve.

These were so good! It's a good thing my deep fryer is a pain in the butt to clean, or else I would be using it much more frequently than is healthy for my waistline! It's amazing how little sugar the batter requires, yet these come out nice and sweet! It's important to use bananas that aren't quite ripe so that they are still a little firm and can hold their shape during the frying process. If the bananas are too ripe, they'll turn to mush! These would be good with cinnamon-sugar sprinkled on top, too!

Monday, August 23, 2010

Eat, Pray, Love Party: Italy

As promised, here is part 1 of my Eat, Pray, Love party series...Italy! For the Italian food, I made meatballs in spaghetti sauce (both TOP-SECRET family recipes), bruschetta (add some balsamic vinegar and garlic to the topping, and just toast the bread by itself, then top with raw topping), and amaretti cookies. These little guys were quite the hit! And the whole recipe is made in your food processor...it really doesn't get any easier than that! Check out the recipe below...


Amaretti Cookies
(from Simply Recipes)

  • 2 1/2 c. almond flour
  • 1 1/4 c. granulated sugar, plus more for dusting
  • 3 egg whites
  • 1/2 tsp. vanilla extract
  • 1 tsp. almond extract

In a food processor, pulse together the almond flour and 1 1/4 c. sugar until combined. Add the extracts, and pulse a few more times. Add in the egg whites, one at a time, processing until the dough is smooth.

Scoop out the dough (I used my smallest cookie scoop--about 2 tsp.) onto parchment paper-lined cookie sheets. Sprinkle with additional granulated sugar. If you like them in pretty little balls, leave as-is. If you prefer a flatter cookie, now would be an excellent time to flatten them out a little. Bake at 300 degrees for ~25 minutes.

Note: the original recipe says to bake until golden brown...which I did, and it ended up being closer to 35-40 minutes, and my cookies were severely overcooked and somewhat dry. Blah. So, I recommend sticking to the 25 minutes, whether or not they're golden brown!